| Name | Last modified | Size | Description | |
|---|---|---|---|---|
| Parent Directory | - | |||
| tuxpaint-quickstart-guide.html | 2024-10-25 16:12 | 9.8K | ||
| tp_magic_example.c | 2024-10-25 16:12 | 19K | ||
| images/ | 2024-10-25 16:27 | - | ||
| SVG.html | 2024-10-25 16:12 | 4.8K | ||
| SIGNALS.html | 2024-10-25 16:12 | 5.7K | ||
| README.html | 2024-10-25 16:12 | 92K | ||
| PNG.html | 2024-10-25 16:12 | 7.8K | ||
| OPTIONS.html | 2024-10-25 16:12 | 118K | ||
| MAGIC-API.html | 2024-10-25 16:12 | 96K | ||
| INSTALL.html | 2024-10-25 16:12 | 69K | ||
| FAQ.html | 2024-10-25 16:12 | 40K | ||
| EXTENDING.html | 2024-10-25 16:12 | 79K | ||
| ENVVARS.html | 2024-10-25 16:12 | 7.2K | ||
| ADVANCED-STAMPS-HOWTO.html | 2024-10-25 16:12 | 19K | ||
Copyright © 2002-2024 by varios colaboradores; see AUTHORS.txt.
https://tuxpaint.org/
25 de Outubro de 2024
| Índice |
|---|
Tux Paint é un programa de debuxo libre e de balde deseñado para cativos (3 ou máis anos). Ten unha interface sinxela e doada de usar, divertidos efectos de son e unha mascota de debuxos animados que axuda a guiar aos cativos mentres usan o programa. Ofrece un lenzo en branco e unha ampla variedade de ferramentas de debuxo para axudar ao seu cativo a ser creativo.
Tux Paint é un proxecto de código aberto, software libre publicado baixo a licenza pública xeral GNU (GPL). É de balde e o «código fonte» detrás do programa está dispoñíbel. (Isto permite a outras persoas engadir funcións, corrixir erros e usar partes do programa no seu propio software GPL).
Consulte o texto completo da licenza GPL en COPYING.txt.
See CHANGES.txt for the complete list of changes.
Tux Paint should have placed a launcher icon in your KDE and/or GNOME menus, under 'Graphics.'
Como alternativa, pode executar a seguinte orde nun indicador do sistema (e dicir, «$»):
$ tuxpaint
Se se producen erros, amosaranse no terminal (en STDERR).
|
Tux Paint |
Se instalou Tux Paint no seu computador usando o «Instalador de Tux Paint», teralle preguntado se quería un atallo no menú «Inicio» e/ou un atallo de escritorio. Se aceptou, pode executar Tux Paint dende a sección «Tux Paint» do menú «Inicio» (p. ex.: en «Todos os programas») ou premendo dúas veces na icona «Tux Paint» do seu escritorio. se fixo que o instalador colocara un alí.
Se está a usar a versión «portátil» (ficheiro ZIP) de Tux Paint ou se usou o «Instalador de Tux Paint», pero escolleu non ter instalados atallos, terá que facer dobre clic na icona «tuxpaint.exe» no cartafol «Tux Paint» do seu computador.
By default, the 'Tux Paint Installer' will put Tux Paint's folder in C:\Program Files\TuxPaint\"
Se usou a descarga de «ficheiro ZIP», o cartafol de Tux Paint estará onde teña extraído o contido do ficheiro ZIP.
Simplemente fai dobre clic na icona «Tux Paint».
![[Pantalla de título]](../../html/images/tuxpaint-title.jpg)
Cando se cargue por primeira vez Tux Paint, aparecerá unha pantalla de título/recoñecementos.
Unha vez completada a carga, prema unha tecla, faga clic ou toque na xanela de Tux Paint para continuar. (Ou, após aproximadamente 5 segundos, a pantalla do título desaparecerá automaticamente.)
A pantalla principal divídese nas seguintes seccións:
![[Ferramentas: Pintar, Selo, Liñas, Formas, Texto, Maxia, Etiqueta, Desfacer, Refacer, Borrador, Novo, Abrir, Gardar, Imprimir, Saír]](../../html/images/tools.jpg)
A barra de ferramentas contén os controis de debuxo e edición.
![[Lenzo]](../../html/images/canvas.jpg)
A parte máis grande da pantalla, no centro, é o lenzo de debuxo. Aquí é, obviamente, onde debuxa.
💡 Nota: O tamaño do lenzo de debuxo depende do tamaño de Tux Paint. Pode cambiar o tamaño de Tux Paint empregando a ferramenta de configuración Tux Paint Config. ou por outros medios. Consulte a documentación das Opcións para obter máis detalles.
![[Selectores: pinceis, letras, formas, selos]](../../html/images/selector.jpg)
Dependendo da ferramenta actual, o selector amosa cousas diferentes. p. ex.: cando se selecciona a ferramenta Pincel ou Liña, amosa os distintos pinceis dispoñíbeis. Cando se selecciona a ferramenta Selo de caucho, amosa as diferentes formas que pode usar. Cando se selecciona a ferramenta Texto ou Etiqueta, amosa varios tipos de letra.
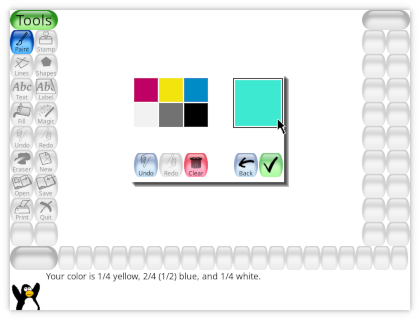
![[Cores: negro, branco, vermello, rosa, laranxa, amarelo, verde, cian, azul, roxo, marrón, gris]](../../html/images/colors.jpg)
When the active tool supports colors, a palette of colors choices will be shown near the bottom of the screen. Click one to choose a color, and it will be used by the active tool. (For example, the "Paint" tool will use it as the color to draw with the chosen brush, and the "Fill" tool will use it as the color to use when flood-filling an area of the picture.)
On the far right are three special color options:
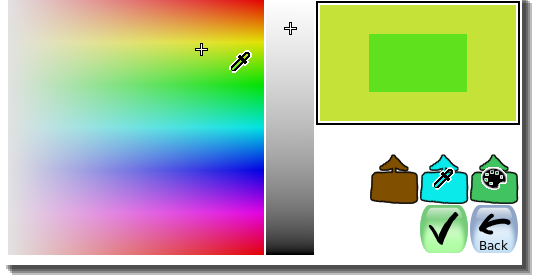
⌨ When the active tool supports colors, a shortcut may be used for quick access to the "color picker" option. Hold the [Control] key while clicking, and the color under the mouse cursor will be shown at the bottom. You may drag around to canvas to find the color you want. When you release the mouse button, the color under the cursor will be selected. If you release the mouse outside of the canvas (e.g., over the "Tools" area), the color selection will be left unchanged. (This is similar to clicking the "Back" button that's available when bringing up the "color picker" option via its button the color palette.)
⚙ Note: You can define your own colors for Tux Paint. See the "Options" documentation.
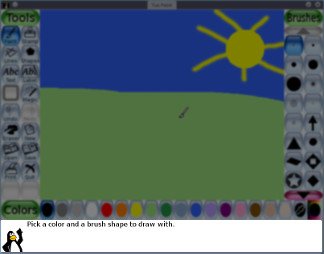
Na parte inferior da pantalla, Tux, o pingüín de Linux, ofrece consellos e outra información mentres usa Tux Paint.
A ferramenta Pincel permítelle debuxar a man alzada usando varios pinceis (escollidos no Selector da dereita) e cores (escollidos na Paleta de cores cara á parte inferior).
Se mantén premido o botón do rato e move o rato, irá debuxando a medida que se move.
Some brushes are animated — they change their shape as you draw them. A good example of this is the vines brush that ships with Tux Paint. These brushes will have a small "filmstrip" icon drawn on their Selector buttons.
Other brushes are directional — they will draw a different shape depending on what direction you are painting with them. An example of this is the arrow brush that ships with Tux Paint. These brushes have a small 8-way arrow icon drawn on their Selector buttons.
Finally, some brushes can be both direction and animated. Examples of this are the cat and squirrel brushes that ship with Tux Paint. These brushes will have both the "filmstrip" and 8-way arrow icons.
Mentres debuxa, soa un son. Canto maior sexa o pincel, menor será o ton.
The space between each position where a brush is applied to the canvas can vary. Some brushes (such as the footprints and flower) are spaced, by default, far enough apart that they don't overlap. Other brushes (such as the basic circular ones) are spaced closely, so they make a continuous stroke.
The default spacing of brushes may be overridden using by clicking within the triangular-shaped series of bars at the bottom right; the larger the bar, the wider the spacing. Brush spacing affects both tools that use the brushes: the "Paint" tool and the "Lines" tool.

⚙ Note: If the "
nobrushspacing" option is set, Tux Paint won't display the brush spacing controls. See the "Options" documentation.
A ferramenta Selo é como un conxunto de selos de cacho ou adhesivos. Permítelle pegar imaxes fotográficas ou debuxadas previamente (como a imaxe dun cabalo, unha árbore ou a lúa) na súa imaxe.
As you move the mouse around the canvas, an outline follows the mouse, showing where the stamp will be placed, and how big it will be. Click on the canvas where you wish to place the stamp.

Using the rotation toggle button near the bottom right, you can enable a rotation step when placing stamps. Once you've placed the stamp, choose the angle to rotate it by moving the mouse around the canvas. Click the mouse button again and the stamp will be added to the drawing.
⚙ Note: If "stamp rotation" option is disabled, the stamp will be drawn on the canvas when you let go of the mouse button. (There's no rotation step.) See the "Options" documentation to learn about the "stamp rotation" ("stamprotation") option.
📜 Note: The stamp rotation feature was added to Tux Paint in version 0.9.29.

Antes de «estampar» unha imaxe no seu debuxo, ás veces pódense aplicar varios efectos (dependendo do selo):
⚙ Note: If the "nostampcontrols" option is set, Tux Paint won't display the Rotation, Mirror, Flip, or sizing controls for stamps. See the "Options" documentation.
Diferentes selos poden ter diferentes efectos sonoros e/ou sons descritivos (falados). Os botóns da área de axuda na parte inferior esquerda (preto de Tux, o pingüín de Linux) permiten reproducir de novo os efectos de son e os sons descritivos para o selo seleccionado nese momento.
Esta ferramenta permítelle debuxar liñas rectas empregando os diversos pinceis e cores que normalmente emprega co pincel.
Click the mouse and hold it to choose the starting point of the line. As you move the mouse around, a thin 'rubber-band' line will show where the line will be drawn. At the bottom, you'll see the angle of your line, in degrees. A line going straight to the right is 0°, a line going straight up is 90°, a line going straight left is 180°, a line going straight down is 270°, and so on.
Solte o rato para completar a liña. Soará un «chimpo».
Some brushes are animated, and will show a pattern of shapes along the line. Others are directional, and will show a different shape depending on the angle of the brush. And finally some are both animated and directional. See "Paint", above, to learn more.
Different brushes have different spacing, leaving either a series of individual shapes, or a continuous stroke of the brush shape. Brush spacing may be adjusted. See the brush spacing section of the "Paint" tool, above, to learn more.

Esta ferramenta permítelle debuxar algunhas formas sinxelas enchidas e sen encher.
Seleccione unha forma do selector da dereita (círculo, cadrado, óvalo, etc.).
Use as opcións da parte inferior dereita para escoller o comportamento da ferramenta de forma:
📜 This was Tux Paint's only behavior through version 0.9.24.)
📜 This option was added starting with Tux Paint version 0.9.25.
⚙ Nota: Se os controis de forma están desactivados (p. ex.: coa opción «noshapecontrols»), non se presentarán os controis e empregarase o método «formas dende o centro».
No lenzo, fprema co rato e manteña o botón premido para estirar a forma dende onde fixo clic. Algunhas formas poden cambiar a proporción (por exemplo, o rectángulo e o óvalo poden ser máis largos que altos ou máis altos que largos), outros non (por exemplo, cadrados e círculos).
For shapes that can change proportion, the aspect ratio of the shape will be shown at the bottom. For example: "1:1" will be shown if it is "square" (as tall as it is wide); "2:1" if it is either twice as wide as it is tall, or twice as tall as it is wide; and so on.
Solte o rato cando remate de estirar.
Now you can move the mouse around the canvas to rotate the shape. The angle your shape is rotated will be shown at the bottom, in degrees (similar to the "Lines" tool, described above).
Prema de novo no botón do rato e a forma debuxarase na cor actual.
⚙ See the "Options" documentation to learn about the "simple shapes" ("simpleshapes") option.
Choose a font (from the 'Letters' available on the right) and a color (from the color palette near the bottom). You may also apply a bold, and/or an italic styling effect to the text. Click on the screen and a cursor will appear. Type text and it will show up on the screen. (You can change the font, color, and styling while entering the text, before it is applied to the canvas.)
Prema [Intro] ou [Retorno] e o texto será debuxado na imaxe e o cursor moverase cara abaixo unha liña.
Como alternativa, prema [Tab] e o texto será debuxado na imaxe, mais o cursor moverase á dereita do texto, no canto de baixar unha liña e á esquerda. (Isto pode ser útil para crear unha liña de texto con cores, tipos de letra, estilos e tamaños mesturados.)
Ao premer noutro lugar da imaxe mentres a entrada de texto aínda está activa, a liña de texto actual moverase a esa posición (onde pode continuar editándoa).
A ferramenta Texto é a ferramenta de entrada de texto orixinal en Tux Paint. O texto introducido usando esta ferramenta non se pode modificar nin mover máis tarde, xa que pasa a formar parte do debuxo. Non obstante, por mor de que o texto pasa a formar parte da imaxe, pódese debuxar ou modificar empregando os efectos da ferramenta Maxia (p. ex.: luxado, tinguido, realce, etc.)
Ao usar a ferramenta Etiqueta (que foi engadida a Tux Paint na versión 0.9.22), o texto «flota» sobre a imaxe e os detalles da etiqueta (o texto, a posición da etiqueta , a opción de letra e a cor) almacénanse por separado. Isto permite recolocar ou editar a etiqueta máis adiante.
To edit a label, click the label selection button. All labels in the drawing will appear highlighted. Click one — or use the [Tab] key to cycle through all the labels, and the [Intro] or [Retorno] key to select one — and you may then edit the label. (Use they [Backspace] key to erase characters, and other keys to add text to the label; click in the canvas to reposition the label; click in the palette to change the color of the text in the label; etc.)
You may "apply" a label to the canvas, painting the text into the picture as if it had been added using the Text tool, by clicking the label application button. (This feature was added in Tux Paint version 0.9.28.) All labels in the drawing will appear highlighted, and you select one just as you do when selecting a label to edit. The chosen label will be removed, and the text will be added directly to the canvas.
⚙ A ferramenta Etiqueta pódese desactivar (p. ex.: seleccionando «Desactivar a ferramenta "Etiqueta"» en Tux Paint Config. ou executando Tux Paint coa opción «nolabel»).
Tux Paint permite introducir caracteres en diferentes idiomas. A maioría dos caracteres latinos (A-Z, ñ, è, etc.) poden introducirse directamente. Algúns idiomas requiren que Tux Paint pase a un modo de entrada alternativo antes de introducilos e algúns caracteres deben compoñerse premendo varias teclas.
Cando a configuración local de Tux Paint está estabelecida nun dos idiomas que fornecen modos de entrada alternativos, úsase unha tecla para pasar do modo normal (caracteres latinos) ao modo ou modos específicos da configuración local.
Currently supported locales, the input methods available, and the key to toggle or cycle modes, are listed below.
[Alt] da dereita or tecla [Alt] da esquerda [Alt] da dereita or tecla [Alt] da esquerda [Alt] da dereita ou tecla [Alt] da esquerda [Alt] da dereita 💡 Note: Many fonts do not include all characters for all languages, so sometimes you'll need to change fonts to see the characters you're trying to type.
An optional on-screen keyboard is available for the Text and Label tools, which can provide a variety of layouts and character composition (e.g., composing "a" and "e" into "æ").
⚙ See the "Options" and "Extending Tux Paint" documentation for more information.
A ferramenta «Encher» inunda unha área contigua do seu debuxo cunha cor da súa escolla. Ofrécense tres opcións de recheo:
📜 Note: Prior to Tux Paint 0.9.24, "Fill" was a Magic tool (see below). Prior to Tux Paint 0.9.26, the "Fill" tool only offered the 'Solid' method of filling. 'Shaped' fill was introduced in Tux Paint 0.9.29.
A ferramenta Maxia é realmente un conxunto de ferramentas especiais. Seleccione un dos efectos «máxicos» no selector da dereita. Após, dependendo da ferramenta, pode premer e arrastrar arredor da imaxe e/ou simplemente premer na imaxe unha vez para aplicar o efecto.
The Magic ToolsMagic ControlsConsulte as instrucións de cada ferramenta Máxica (no cartafol «magic-docs»).
Magic SizingSe a ferramenta pode usarse premendo e arrastrando, estará dispoñíbel un botón de «pintura» á esquerda, baixo a lista de ferramentas Maxia na parte dereita da pantalla. Se a ferramenta pode afectar toda a imaxe á vez, haberá un botón «imaxe completa» á dereita.

⚙ Note: If the "
nomagiccontrols" option is set, Tux Paint won't display the painting or entire picture controls. See the "Options" documentation.💡 If the magic controls are disabled, the Magic plugin may make separate tools available, one for painting and one that affects the entire pictre.
Some tools offer different sizing options. If so, a slider will appear at the bottom right side of the screen. This may affect the radius of a special effect (e.g., Darken) or painted object (e.g., Patterns), or other attributes (e.g., large versus small Brick shapes).
⚙ Note: If the "
nomagicsizes" option is set, Tux Paint won't display the sizing controls. See the "Options" documentation.💡 If the sizing option is disabled, the Magic plugin may simply offer a default size (e.g., Patterns), or it may make separate tools available with different pre-set sizes (e.g., Bricks and Googly Eyes).
📜 This option was added starting with Tux Paint version 0.9.30.
⚙ Note: If the "ungroupmagictools" option is set, Tux Paint won't split Magic tools into groups of related tools, and instead present them all as one large list. See the "Options" documentation.
This tool works similarly to the Paint Brush. Wherever you click (or click and drag), things you've added to your drawing will be erased, exposing the background that you chose when you started the drawing, be it a solid color, the background of a 'Starter' image, or a 'Template' image. (See Ferramentas dispoñíbeis > Outros controis > Orde «Novo».)
 A number of eraser types are available, each offering multiple sizes are available:
As you move the mouse around, an outline follows the pointer, showing what part of the picture will be erased.
Ao borralo, reprodúcese un son de borrado «rechiante».
⌨ Hold the [X] key while clicking for quick access to a small sharp round eraser (not available when the Text or Label tools are selected, when you're in the process of rotating a stamp or shape, or when using an interactive magic tool). Release the mouse to return to your currently-selected tool.
Clicking the "Undo" button will undo (revert) the last drawing action. You can even undo more than once!
⌨ Nota: Tamén pode premer [Control / ⌘] + [Z] no teclado para Desfacer.
Clicking the "Redo" button will redo the drawing action you just un-did via the "Undo" command.
Mentres non volva debuxar, pode refacer tantas veces como teña desfeito.
⌨ Nota: Tamén pode premer [Control / ⌘] + [R] no teclado para Refacer.
Clicking the 'New' button will start a new drawing. A dialog will appear where you may choose to start a new picture using a solid background color, or using a 'Starter' or 'Template' image (see below). You will first be asked whether you really want to do this.
When you use the 'Eraser' tool things you've added to your drawing will be removed, exposing the background you chose when starting a new drawing. (See Ferramentas dispoñíbeis > Ferramentas de debuxo > Ferramenta de «Goma» (de borrar).)
⌨ Nota: Tamén pode premer [Control / ⌘] + [N] no teclado para iniciar un novo debuxo.
When using the 'Eraser' tool or the 'Eraser' mode of the 'Fill' tool, the original image from the 'Starter' or 'Template' will reappear. (See Ferramentas dispoñíbeis > Ferramentas de debuxo > Ferramenta de «Goma» (de borrar) and Ferramenta «Encher».)
The 'Flip' and 'Mirror' Magic tools affect the orientation of the 'Starter' or 'Template', as well. (See Ferramentas dispoñíbeis > Ferramenta «Maxia» (efectos especiais) > Flip and Mirror.)
Cando carga unha «imaxe de inicio» ou un «modelo», debuxa nel(a) e logo preme en «Gardar», crea un novo ficheiro de imaxe; non sobrescribe o orixinal, polo que pode usalo de novo máis adiante (accedendo a el dende o diálogo «Novo»).
⚙ You can create your own 'Starter' and Template images. See the Extending Tux Paint documentation's sections on 'Starters' and Templates.
💡 You can also convert your saved drawings into Templates directly within Tux Paint, from the 'Open' dialog. See "Open", below.
If you've selected a Template in your personal templates folder, and it was created from within Tux Paint (using the "Template" button in the "Open" dialog), you may remove it from within Tux Paint, too. An 'Erase' (trash can) button will appear at the lower right of the list. Click it to erase the selected template. (You will be asked to confirm.)
💡 Note: On Linux, Windows, and macOS, the picture will be placed in your desktop's trash can / recycle bin (where you may recover and restore it, if you change your mind).
⚙ Note: The 'Erase' button may be disabled, via the "noerase" option.
⚙ Note: The solid colors can be placed at the end of the 'New' dialog (below the Starters and Templates), via the "newcolorslast" option.
Isto amosa unha lista de todas as imaxes que gardou. Se hai máis do que pode caber na pantalla, use as frechas arriba e abaixo na parte superior e inferior da lista para desprazarse pola lista de imaxes.
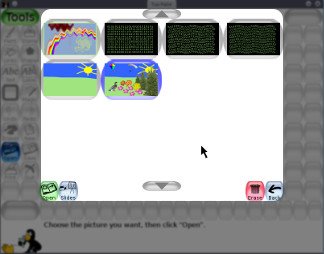
Prema nunha imaxe para seleccionala e logo...
Click the green 'Open' button at the lower left of the list to load the selected picture. You will then be able to edit it.
(Como alternativa, pode facer dobre clic na icona dunha imaxe para cargala.)
💡 If choose to open a picture, and your current drawing hasn't been saved, you will be prompted as to whether you want to save it or not. (See "Save," below.)
Prema no botón marrón «Borrar» (cesta do lixo) na parte inferior dereita da lista para borrar a imaxe seleccionada. (Pediráselle que o confirme).
📜 Note: On Linux (as of version 0.9.22), Windows (as of version 0.9.27), and macOS (as of version 0.9.29), the picture will be placed in your desktop's trash can / recycle bin (where you may recover and restore it, if you change your mind).
⚙ Note: The 'Erase' button may be disabled, via the "noerase" option.
Click the 'Export' button near the lower right to export the selected picture to your export folder. (e.g., "~/Pictures/TuxPaint/")
From the "Open" screen you can also:
Click the blue 'Slides' (slide projector) button at the lower left to go to slideshow mode. See "Slides", below, for details.
Click the blue 'Template' button at the lower left to go to convert the selected picture into a new template, which can be used as the basis for new drawings.
📜 Note: The Template creation feature was added to Tux Paint in version 0.9.31. To learn how to create Templates outside of Tux Paint, see Extending Tux Paint
⚙ The Template creation feature can be disabled (e.g., by selecting "Disable 'Make Template'" in Tux Paint Config. or running Tux Paint with the "notemplateexport" option).
Prema no botón de frecha vermello «Atrás» situado na parte inferior dereita da lista para cancelar e volver á imaxe que debuxaba.
⌨ Nota: Tamén pode premer [Control / ⌘] + [O] no teclado para activar o diálogo «Abrir».
Isto garda a súa imaxe actual.
Se non o gardou antes, creará unha nova entrada na lista de imaxes gardadas. (é dicir, creará un novo ficheiro)
💡 Nota: Non lle pedirá nada (por exemplo, un nome de ficheiro). Simplemente gardará a imaxe e reproducirá un efecto de son «obturador de cámara».
Se xa gardou a imaxe antes, ou esta é unha imaxe que acaba de cargar coa orde «Abrir», primeiro preguntaráselle se quere gardar sobre a versión antiga ou crear unha nova entrada (un novo ficheiro).
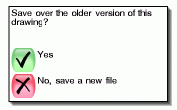
⚙ Nota: Se foron estabelecidas as opcións «saveover» ou «saveovernew», non preguntará antes de gardar. Vexa a documentación de «Opcións».
⌨ Nota: Tamén pode premer [Control / ⌘] + [S] no teclado para gardar.
Prema neste botón e imprimirase a súa imaxe.
Na maioría das plataformas, tamén pode manter premida a tecla [Alt] (chamada [Opción] en Mac) ao premer no botón «Imprimir» para obter unhja caixa de diálogo coa impresora. Teña en conta que isto pode non funcionar se está a executar Tux Paint en modo de pantalla completa. Vexa a continuación.
Pódese estabelecer a opción «noprint», que desactivará o botón «Imprimir» de Tux Paint.
⚙ Vexa a documentación de «Opcións.
Pódese estabelecer a opción «printdelay», que só permitirá imprimir ocasionalmente, cada tantos segundos, segundo o configure vostede.
Por exemplo, con «printdelay=60» no ficheiro de configuración de Tux Paint, a impresión só pode producirse unha vez por minuto (60 segundos).
⚙ Vexa a documentación de «Opcións.
(Só Linux e Unix)
Tux Paint imprime creando unha representación PostScript da imaxe e envíaa a un programa externo. De xeito predeterminado, o programa é:
lpr
Esta orde pódese cambiar axustando unha opción «printcommand» no ficheiro de configuración de Tux Paint.
Pódese invocar unha orde de impresión alternativa mantendo premida a tecla «[Alt]» ao premer no botón «Imprimir», sempre que non estea en modo de pantalla completa, execútase un programa alternativo. De xeito predeterminado, o programa é o diálogo de impresión gráfica de KDE:
kprinter
Esta orde pódese cambiar axustando unha opción «altprintcommand» no ficheiro de configuración de Tux Paint.
⚙ Vexa a documentación de «Opcións.
(Windows e macOS)
De xeito predeterminado, Tux Paint simplemente imprime na impresora predeterminada cos axustes predeterminados cando se preme o botón «Imprimir».
Non obstante, se mantén premida a tecla [Alt] (ou [Opción]) mentres cando preme no botón «Imprimir», sempre que non estea en modo de pantalla completa, aparecerá o diálogo da impresora do seu sistema operativo no que poderá cambiar os axustes.
Pode gardar os cambios na configuración da impresora entre as sesións de Tux Paint axustando a opción «printcfg».
Se se usa a opción «printcfg», os axustes da impresora cargaranse dende o ficheiro «printcfg.cfg» no seu cartafol persoal (ver a continuación). Calquera cambio tamén se gardará alí.
⚙ Vexa a documentación de «Opcións.
De xeito predeterminado, Tux Paint só amosa o diálogo da impresora (ou, en Linux/Unix, executa «altprintcommand»; p. ex.: «kprinter» no canto de «lpr») se se mantén premida a tecla [Alt] (ou [Opción]) ao premer no botón «Imprimir».
Non obstante, este comportamento pódese cambiar. Pode facer que o diálogo da impresora apareza sempre usando «--altprintalways» na liña de ordes ou «altprint=always» no ficheiro de configuración de Tux Paint. Pola contra, pode evitar que a tecla [Alt]/[Opción] teña ningún efecto empregando «--altprintnever» ou «altprint=never».
⚙ Vexa a documentación de «Opcións.
O botón «Diapositivas» está dispoñíbel no diálogo «Abrir». Pode usarse para reproducir unha animación sinxela dentro de Tux Paint ou un diaporama. Tamén pode exportar un GIF animado baseado nas imaxes escollidas.
Cando entra na sección «Diapositivas» de Tux Paint, amosase unha lista dos seus ficheiros gardados, do mesmo xeito que o diálogo «Abrir».
Prema en cada unha das imaxes que quere amosar nun diaporama ao modo de presentación de diapositivas, unha por unha. Aparecerá un díxito sobre cada imaxe, indicándolle en que orde se amosarán.
Pode premer nunha imaxe seleccionada para desmarcala (sacala do diaporama). Prema de novo se quere engadila ao final da lista.
Pódese usar unha escala desprazábel na parte inferior esquerda da pantalla (xunto ao botón «Reproducir») para axustar a velocidade do diaporama ou do GIF animado, de máis lenta a máis rápida. Escolla o axuste máis á esquerda para desactivar o avance automático durante a reprodución dentro de Tux Paint; terá que premer unha tecla ou facer clic para ir á seguinte diapositiva (ver a continuación).
💡 Nota: O axuste máis lento non avanza automaticamente entre as diapositivas. Úseo para cando queira percorrelas manualmente. (Isto non se aplica a un GIF animado exportado).
To play a slideshow within Tux Paint, click the 'Play' button.
💡 Note: If you hadn't selected any images, then all of your saved images will be played in the slideshow!
Durante a presentación de diapositivas, prema [Espazo], [Intro] ou [Retorno] ou o [Frecha cara á dereita] —ou prema no botón «Seguinte»— na parte inferior esquerda para avanzar manualmente á seguinte diapositiva. Prema [Frecha cara arriba] para volver á diapositiva anterior.
Prema [Escape] ou prema no botón «Atrás» na parte inferior dereita para saír do diaporama e volver á pantalla de selección de imaxes do diaporama.
![]() Prema no botón «Exportar GIF» preto da parte inferior dereita para que Tux Paint xere un ficheiro GIF animado baseado nas imaxes seleccionadas.
Prema no botón «Exportar GIF» preto da parte inferior dereita para que Tux Paint xere un ficheiro GIF animado baseado nas imaxes seleccionadas.
💡 Note: At least two images must be selected. (To export a single image, use the 'Export' option from the main 'Open' dialog.) If no images are selected, Tux Paint will not attempt to generate a GIF based on all saved images.
Ao premer [Escape] durante o proceso de exportación abortarase e volverá ao diálogo «Diaporama».
Prema en «Atrás» na pantalla de selección de imaxes de diapositivas para volver ao diálogo «Abrir».
Ao premer no botón «Saír», pechando a xanela de Tux Paint ou premendo a tecla [Escape] sairase de Tux Paint.
Primeiro preguntaráselle se realmente quere saír.
If you choose to quit, and you haven't saved the current picture, you will first be asked if wish to save it. If it's not a new image, you will then be asked if you want to save over the old version, or create a new entry. (See "Save" above.)
⚙ Nota: Se se garda a imaxe, volverá cargarse automaticamente a próxima vez que execute Tux Paint, a non ser que estea configurada a opción «startblank».
⚙ Nota: O botón «Saír» de Tux Paint e saír a través da tecla [Escape] pode estar desactivado mediante a opción «noquit».
Nese caso, pódese usar o botón «pechar a xanela» na barra de título de Tux Paint (se non está en modo pantalla completa) ou a secuencia de teclas [Alt] + [F4] para saír.
Se ningún das dúas é posíbel, pódese usar a secuencia de teclas [Maiúsculas] + [Control / ⌘] + [Escape] para saír.
⚙ Vexa a documentación de «Opcións.
Non hai ningún botón de control na pantalla neste momento, pero ao usar a secuencia de teclado [Alt] + [S], os efectos de son pódense desactivar e volver activar (silenciado e sactivado) mentres o programa está en execución.
Teña en conta que se os sons están completamente desactivados mediante a opción «nosound», a combinación de teclas [Alt] + [S] non ten efecto. (é dicir, non se pode usar para activar os sons cando o pai ou o profesor quere que estean desactivados).
⚙ Vexa a documentación de «Opcións.
Tux Paint's main mode of operation is via any device that appears to your operating system as a mouse, including standard mice, trackballs, and trackpads, as well as drawing tablets (usually operated with a stylus) and touch screens (operated with a finger and/or a stylus) (see "Using a Tablet or Touchscreen" below for more information).
For drawing and controlling Tux Paint, only a single mouse button is used — typically, on multi-button mice, this will the left mouse button, but this can usually be configured at the operating system level. By default, Tux Paint will ignore input from the other button(s). If a user attempts to use the other button(s), a pop-up dialog will eventually appear reminding them that only one button is recognized Tux Paint. However, you may configure Tux Paint to accept any button as input (see the Options documentation).
Many input devices offer a way to quickly scroll within applications — many mice have a scroll wheel, trackballs have scroll rings, and trackpads recognize certain "scroll" gestures (e.g., two-finger vertical motion, or vertical motion on the edge of the trackpad). Tux Paint supports scrolling input to allow quick scrolling through certain lists (e.g., Stamps, Magic tools, and the New and Open dialogs).
Tux Paint will also automatically scroll if you click and hold the mouse down on an scroll button — the "up" and "down" arrow buttons that appear above and below scrolling lists.
Other devices that appear as a mouse can be used to control Tux Paint. For example:
Tux Paint offers a "sticky mouse click" accessibility setting, where a single click begins a click-and-drag operation, and a subsequent click ends it. (See the Options documentation.)
As noted above, Tux Paint recognizes any device that appears as a mouse. This means drawing tablets and touchscreens may be used. However, these devices often support other features beyond X/Y motion, button clicks, and scroll-wheel motion. Currently, those additional features are not supported by Tux Paint. Some examples:
Tux Paint may be configured to recognize input from any game controller that appears to your operating system as a joystick. That even includes modern game console controllers connected via USB or Bluetooth (e.g., Nintendo Switch or Microsoft Xbox game pads)!
Numerous configuration options are available to best suit the device being used, and the user's needs. Analog input will be used for coarse movement, and digital "hat" input for fine movement. Buttons on the controller can be mapped to different Tux Paint controls (e.g., acting as the [Escape] key, switching to the Paint tool, invoking Undo and Redo operations, etc.). See the Options documentation for more details.
Tux Paint offers an option to allow the keyboard to be used to control the mouse pointer. This includes motion and clicking, as well as shortcuts to navigate between and within certain parts of the interface. See the Options documentation for more details.
O diálogo «Abrir» de Tux Paint só amosa as imaxes que creou con Tux Paint. Entón, que facer se quere cargar algún outro debuxo ou incluso unha fotografía en Tux Paint para poder editala ou debuxar sobre ela?
Pode simplemente converter a imaxe ao formato que usa Tux Paint –PNG (Portable Network Graphics – Gráficos de Rede Portátiles)– e colocala no directorio/cartafol «saved» de Tux Paint. Aquí é onde se atopa (de xeito predeterminado:
C:\Users\nome de usuario\AppData\Roaming\TuxPaint\saved\"/Users/nome de usuario/Library/Application Support/TuxPaint/saved/"/home/nome de usuario/.tuxpaint/saved/"/boot/home/config/settings/TuxPaint/saved/"💡 Nota: É tamén dende este cartafol dende onde pode copiar ou abrir imaxes debuxadas en Tux Paint usando outras aplicacións, aínda que pode usar a opción «Exportar» do diálogo «Abrir» de Tux Paint para copialas a unha localización de acceso máis doado e seguro.
tuxpaint-import»
Os usuarios de Linux e Unix poden usar o script «tuxpaint-import» que se instala ao instalar Tux Paint. Emprega algunhas ferramentas NetPBM para converter a imaxe («anytopnm»), redimensionala de xeito que poida caber no lenzo de Tux Paint («pnmscale») e convertela a PNG («pnmtopng»).
Tamén usa a orde «date» para obter a hora e a data actual, que é a convención de nomes de ficheiros que usa Tux Paint para os ficheiros gardados. (Lembre que nunca se lle pide un «nome de ficheiro» cando vai gardar ou abrir imaxes.)
Para usar este script, abonda con executalo dende unha liña de ordes e fornecerlle o nome do ficheiro que quere converter.
They will be converted and placed in your Tux Paint "saved" directory.
💡 Note: If you're doing this for a different user (e.g., your child) you'll need to make sure to run the command under their account.)
Exemplo:
$ tuxpaint-import avoa.jpg

      avoa.jpg ->
      /home/username/.tuxpaint/saved/20211231012359.png

      jpegtopnm: WRITING A PPM FILE
A primeira liña («tuxpaint-import avoa.jpg») é a orde a executar. As dúas liñas seguintes son a saída do programa mentres funciona.
Agora pode cargar Tux Paint e unha versión desa imaxe orixinal estará dispoñíbel no diálogo «Abrir». Só ten que premer dúas veces na súa icona.
Os usuarios de Windows, macOS e Haiku que queiran importar imaxes arbitrarias a Tux Paint deben facelo mediante un proceso manual.
Cargue un programa gráfico que sexa quen tanto de cargar a súa imaxe como de gardar un ficheiro en formato PNG. (Vexa o ficheiro de documentación «PNG.html» para obter unha lista do software suxerido e outras referencias.)
Cando Tux Paint carga unha imaxe que non ten o mesmo tamaño que o seu lenzo de debuxo, escala (e ás veces mancha os bordos) da imaxe para que se axuste ao lenzo.
Para evitar que a imaxe se estire ou manche, pode redimensionala ao tamaño do lenzo de Tux Paint. Este tamaño depende do tamaño da xanela de Tux Paint ou da resolución coa que se executa Tux Paint, se está en pantalla completa. (Nota: A resolución predeterminada é 800x600.) Vexa «Cálculo das dimensións da imaxe», a continuación.
Gardar a imaxe en formato PNG. Recoméndase encarecidamente que nomee o ficheiro usando a data e hora actuais, xa que esa é a convención que usa Tux Paint:
AAAAMMDDhhmmss.png
AAAA = AnoMM = Mes (dous díxitos, «01»-«12»)DD = Día do mes (dous díxitos, «01»-«31»)HH = Hora (dous díxitos, en formato 24 horas, «00»-«23»)mm = Minuto (dous díxitos, «00»-«59»)ss = Segundo (dous díxitos, «00»-«59»)
Exemplo: «20210731110500.png», para o 31 de xullo de 2021 ás 11:05am.
Coloque este ficheiro PNG no seu directorio/cartafol «saved» de Tux Paint. (Ver arriba.)
É preciso reescribir esta parte da documentación xa que se engadiu a nova opción «buttonsize». Polo de agora, tente debuxar e gardar unha imaxe dentro de Tux Paint, logo determine o tamaño (largo e alto en píxeles) que obtivo e tente igualar iso ao escalar a(s) imaxe(s) que está a importar en Tux Paint.
Outra documentación incluída con Tux Paint (que se atopa no cartafol/directorio «docs») inclúe:
magic-docs»)If you need help, there are numerous ways to interact with Tux Paint developers and other users:
Para obter máis información, visite a páxina «Contacto» do sitio web oficial de Tux Paint: https://tuxpaint.org/contact/
Tux Paint is a volunteer-driven project, and we're happy to accept your help in a variety of ways:
Para obter máis información, visite a páxina «Colabora connosco» do sitio web oficial de Tux Paint: https://tuxpaint.org/help/
Tux Paint maintains a presence on a variety of social media networks, where we post updates and artwork.