version 0.9.35
A simple drawing program for children
Copyright © 2002-2025 by various contributors; see AUTHORS.txt.
https://tuxpaint.org/
May 26, 2025
| Table of Contents |
|---|
Copyright © 2002-2025 by various contributors; see AUTHORS.txt.
https://tuxpaint.org/
May 26, 2025
| Table of Contents |
|---|
Tux Paint is a free drawing program designed for young children (kids ages 3 and up). It has a simple, easy-to-use interface, fun sound effects, and an encouraging cartoon mascot who helps guide children as they use the program. It provides a blank canvas and a variety of drawing tools to help your child be creative.
Tux Paint is an Open Source project, Free Software released under the GNU General Public License (GPL). It is free, and the 'source code' behind the program is available. (This allows others to add features, fix bugs, and use parts of the program in their own GPL'd software.)
See COPYING.txt for the full text of the GPL license.
See CHANGES.txt for the complete list of changes.
Tux Paint should have placed a launcher icon in your KDE and/or GNOME menus, under 'Graphics.'
Alternatively, you can run the following command at a shell prompt (e.g., "$"):
$ tuxpaint
If any errors occur, they will be displayed on the terminal (to STDERR).
|
Tux Paint |
If you installed Tux Paint on your computer using the 'Tux Paint Installer,' it will have asked you whether you wanted a 'Start' menu short-cut, and/or a desktop shortcut. If you agreed, you can simply run Tux Paint from the 'Tux Paint' section of your 'Start' menu (e.g., under 'All Programs'), or by double-clicking the 'Tux Paint' icon on your desktop, if you had the installer place one there.
If you're using the 'portable' (ZIP-file) version of Tux Paint, or if you used the 'Tux Paint Installer,' but chose not to have shortcuts installed, you'll need to double-click the "tuxpaint.exe" icon in the "Tux Paint" folder on your computer.
By default, the 'Tux Paint Installer' will put Tux Paint's folder in C:\Program Files\TuxPaint\"
If you used the 'ZIP-file' download, Tux Paint's folder will be wherever you extracted the contents of the ZIP file.
Simply double-click the "Tux Paint" icon.
![[Title screen]](../../html/images/tuxpaint-title.jpg)
When Tux Paint first loads, a title/credits screen will appear.
Once loading is complete, press a key or click or tap in the Tux Paint window to continue. (Or, after about 5 seconds, the title screen will go away automatically.)
The main screen is divided into the following sections:
![[Tools: Paint, Stamp, Lines, Shapes, Text, Magic, Label, Undo, Redo, Eraser, New, Open, Save, Print, Quit]](../../html/images/tools.jpg)
The toolbar contains the drawing and editing controls.
![[Canvas]](../../html/images/canvas.jpg)
The largest part of the screen, in the center, is the drawing canvas. This is, obviously, where you draw!
💡 Note: The size of the drawing canvas depends on the size of Tux Paint. You can change the size of Tux Paint using the Tux Paint Config. configuration tool, or by other means. See the Options documentation for more details.
![[Selectors - Brushes, Letters, Shapes, Stamps]](../../html/images/selector.jpg)
Depending on the current tool, the selector shows different things. e.g., when the Paint Brush or Line tool is selected, it shows the various brushes available. When the Rubber Stamp tool is selected, it shows the different shapes you can use. When the Text or Label tool is selected, it shows various fonts.
![[Colors - Black, White, Red, Pink, Orange, Yellow, Green, Cyan, Blue, Purple, Brown, Grey]](../../html/images/colors.jpg)
When the active tool supports colors, a palette of colors choices will be shown near the bottom of the screen. Click one to choose a color, and it will be used by the active tool. (For example, the "Paint" tool will use it as the color to draw with the chosen brush, and the "Fill" tool will use it as the color to use when flood-filling an area of the picture.)
On the far right are three special color options:
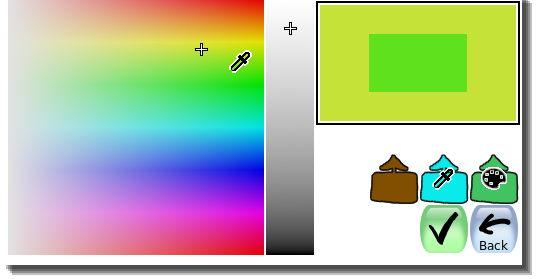

⌨ When the active tool supports colors, a shortcut may be used for quick access to the "color picker" option. Hold the [Control] key while clicking, and the color under the mouse cursor will be shown at the bottom. You may drag around to canvas to find the color you want. When you release the mouse button, the color under the cursor will be selected. If you release the mouse outside of the canvas (e.g., over the "Tools" area), the color selection will be left unchanged. (This is similar to clicking the "Back" button that's available when bringing up the "color picker" option via its button the color palette.)
⚙ Note: You can define your own colors for Tux Paint. See the "Options" documentation.
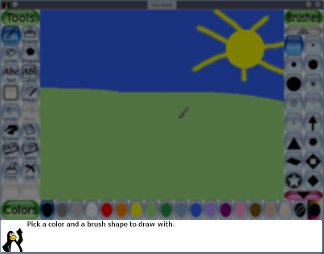
At the very bottom of the screen, Tux, the Linux Penguin, provides tips and other information while you use Tux Paint.
The Paint Brush tool lets you draw freehand, using various brushes (chosen in the Selector on the right) and colors (chosen in the Color palette towards the bottom).
If you hold the mouse button down, and move the mouse, it will draw as you move.
Some brushes are animated — they change their shape as you draw them. A good example of this is the vines brush that ships with Tux Paint. These brushes will have a small "filmstrip" icon drawn on their Selector buttons.
Other brushes are directional — they will draw a different shape depending on what direction you are painting with them. An example of this is the arrow brush that ships with Tux Paint. These brushes have a small 8-way arrow icon drawn on their Selector buttons.
Finally, some brushes can be both direction and animated. Examples of this are the cat and squirrel brushes that ship with Tux Paint. These brushes will have both the "filmstrip" and 8-way arrow icons.
As you draw, a sound is played. The bigger the brush, the lower the pitch.
The space between each position where a brush is applied to the canvas can vary. Some brushes (such as the footprints and flower) are spaced, by default, far enough apart that they don't overlap. Other brushes (such as the basic circular ones) are spaced closely, so they make a continuous stroke.
The default spacing of brushes may be overridden using by clicking within the triangular-shaped series of bars at the bottom right; the larger the bar, the wider the spacing. Brush spacing affects both tools that use the brushes: the "Paint" tool and the "Lines" tool.

⚙ Note: If the "
nobrushspacing" option is set, Tux Paint won't display the brush spacing controls. See the "Options" documentation.
The Stamp tool is like a set of rubber stamps or stickers. It lets you paste pre-drawn or photographic images (like a picture of a horse, or a tree, or the moon) in your picture.
As you move the mouse around the canvas, an outline follows the mouse, showing where the stamp will be placed, and how big it will be. Click on the canvas where you wish to place the stamp.
Using the rotation toggle button near the bottom right, you can enable a rotation step when placing stamps. Once you've placed the stamp, choose the angle to rotate it by moving the mouse around the canvas. Click the mouse button again and the stamp will be added to the drawing.
⚙ Note: If "stamp rotation" option is disabled, the stamp will be drawn on the canvas when you let go of the mouse button. (There's no rotation step.) See the "Options" documentation to learn about the "stamp rotation" ("stamprotation") option.
📜 Note: The stamp rotation feature was added to Tux Paint in version 0.9.29.

Prior to 'stamping' an image onto your drawing, various effects can sometimes be applied (depending on the stamp):
⚙ Note: If the "nostampcontrols" option is set, Tux Paint won't display the Rotation, Mirror, Flip, or sizing controls for stamps. See the "Options" documentation.
Different stamps can have different sound effects and/or descriptive (spoken) sounds. Buttons in the Help Area at the lower left (near Tux, the Linux penguin) allow you to re-play the sound effects and descriptive sounds for the currently-selected stamp.
This tool lets you draw straight lines using the various brushes and colors you normally use with the Paint Brush.
Click the mouse and hold it to choose the starting point of the line. As you move the mouse around, a thin 'rubber-band' line will show where the line will be drawn. At the bottom, you'll see the angle of your line, in degrees. A line going straight to the right is 0°, a line going straight up is 90°, a line going straight left is 180°, a line going straight down is 270°, and so on.
Let go of the mouse to complete the line. A "sproing!" sound will play.
Some brushes are animated, and will show a pattern of shapes along the line. Others are directional, and will show a different shape depending on the angle of the brush. And finally some are both animated and directional. See "Paint", above, to learn more.
Different brushes have different spacing, leaving either a series of individual shapes, or a continuous stroke of the brush shape. Brush spacing may be adjusted. See the brush spacing section of the "Paint" tool, above, to learn more.
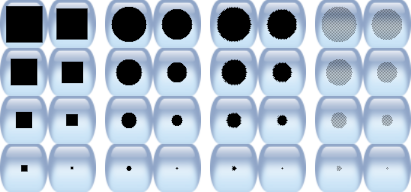
This tool lets you draw some simple filled, and un-filled shapes.
Select a shape from the selector on the right (circle, square, oval, etc.).
Use the options at the bottom right to choose the shape tool's behavior:
📜 This was Tux Paint's only behavior through version 0.9.24.)
📜 This option was added starting with Tux Paint version 0.9.25.
⚙ Note: If shape controls are disabled (e.g., with the "noshapecontrols" option), the controls will not be presented, and the "shapes from center" method will be used.
In the canvas, click the mouse and hold it to stretch the shape out from where you clicked. Some shapes can change proportion (e.g., rectangle and oval may be wider than tall, or taller than wide), others cannot (e.g., square and circle).
For shapes that can change proportion, the aspect ratio of the shape will be shown at the bottom. For example: "1:1" will be shown if it is "square" (as tall as it is wide); "2:1" if it is either twice as wide as it is tall, or twice as tall as it is wide; and so on.
Let go of the mouse when you're done stretching.
Now you can move the mouse around the canvas to rotate the shape. The angle your shape is rotated will be shown at the bottom, in degrees (similar to the "Lines" tool, described above).
Click the mouse button again and the shape will be drawn in the current color.
⚙ See the "Options" documentation to learn about the "simple shapes" ("simpleshapes") option.
Choose a font (from the 'Letters' available on the right) and a color (from the color palette near the bottom). You may also apply a bold, and/or an italic styling effect to the text. Click on the screen and a cursor will appear. Type text and it will show up on the screen. (You can change the font, color, and styling while entering the text, before it is applied to the canvas.)
Press [Enter] or [Return] and the text will be drawn onto the picture and the cursor will move down one line.
Alternatively, press [Tab] and the text will be drawn onto the picture, but the cursor will move to the right of the text, rather than down a line, and to the left. (This can be useful to create a line of text with mixed colors, fonts, styles and sizes.)
Text from the clipboard (copy/paste buffer) can be inserted with the "Text" and "Label" tools by pressing the [Control] + [V] key combination on a physical keyboard, or clicking the "Paste" button in Tux Paint's on-screen keyboard. If the text would exceed the right edge of the canvas, it will wrap to a new line of text (going back to the previous space or dash ('-') if possible). If the text hits the bottom of the canvas, the pasting will abort, truncating the text.
Clicking elsewhere in the picture while the text entry is still active causes the current line of text to move to that location (where you can continue editing it).
The Text tool is the original text-entry tool in Tux Paint. Text entered using this tool can't be modified or moved later, since it becomes part of the drawing. However, because the text becomes part of the picture, it can be drawn over or modified using Magic tool effects (e.g., smudged, tinted, embossed, etc.)
When using the Label tool (which was added to Tux Paint in version 0.9.22), the text 'floats' over the image, and the details of the label (the text, the position of the label, the font choice and the color) get stored separately. This allows the label to be repositioned or edited later.
To edit a label, click the label selection button. All labels in the drawing will appear highlighted. Click one — or use the [Tab] key to cycle through all the labels, and the [Enter] or [Return] key to select one — and you may then edit the label. (Use they [Backspace] key to erase characters, and other keys to add text to the label; click in the canvas to reposition the label; click in the palette to change the color of the text in the label; etc.)
You may "apply" a label to the canvas, painting the text into the picture as if it had been added using the Text tool, by clicking the label application button. (This feature was added in Tux Paint version 0.9.28.) All labels in the drawing will appear highlighted, and you select one just as you do when selecting a label to edit. The chosen label will be removed, and the text will be added directly to the canvas.
⚙ The Label tool can be disabled (e.g., by selecting "Disable 'Label' Tool" in Tux Paint Config. or running Tux Paint with the "nolabel" option).
📜 The ability to paste text from the clipboard was added in Tux Paint 0.9.35
Tux Paint allows inputting characters in different languages. Most Latin characters (A-Z, ñ, è, etc.) can by entered directly. Some languages require that Tux Paint be switched into an alternate input mode before entering, and some characters must be composed using numerous keypresses.
When Tux Paint's locale is set to one of the languages that provide alternate input modes, a key is used to cycle through normal (Latin character) and locale-specific mode or modes.
Currently supported locales, the input methods available, and the key to toggle or cycle modes, are listed below.
[Alt] key or left [Alt] key [Alt] key or left [Alt] key [Alt] key or left [Alt] key [Alt] key 💡 Note: Many fonts do not include all characters for all languages, so sometimes you'll need to change fonts to see the characters you're trying to type.
An optional on-screen keyboard is available for the Text and Label tools, which can provide a variety of layouts and character composition (e.g., composing "a" and "e" into "æ"). Run Tux Paint with the "--onscreen-keyboard" option, or enable that setting in Tux Paint's configuration file, to enable it. Multiple layouts are offered (currently "QWERTY" and "ABC"), which the user can switch between. Additional configuration options allow specifying a default layout, as well as preventing the layout from being changed.
The on-screen keyboard appears at the bottom or top of the Tux Paint window, obscuring part of the canvas, depending on where the text insertion cursor is placed. Along with alphabetic, numeric, and some punctuation keys, the keyboard provides:
⚙ See the "Options" and "Extending Tux Paint" documentation for more information.
The 'Fill' tool 'flood-fills' a contiguous area of your drawing with a color of your choice. Three fill options are offered:
📜 Note: Prior to Tux Paint 0.9.24, "Fill" was a Magic tool (see below). Prior to Tux Paint 0.9.26, the "Fill" tool only offered the 'Solid' method of filling. 'Shaped' fill was introduced in Tux Paint 0.9.29.
The Magic tool is actually a set of special tools. Select one of the 'magic' effects from the selector on the right. Then, depending on the tool, you can either click and drag around the picture, and/or simply click the picture once, to apply the effect.
The Magic ToolsMagic ControlsSee the instructions for each Magic tool (in the 'magic-docs' folder).
Magic SizingIf the tool can be used by clicking and dragging, a 'painting' button will be available on the left, below the list of Magic tools on the right side of the screen. If the tool can affect the entire picture at once, an 'entire picture' button will be available on the right.

⚙ Note: If the "
nomagiccontrols" option is set, Tux Paint won't display the painting or entire picture controls. See the "Options" documentation.💡 If the magic controls are disabled, the Magic plugin may make separate tools available, one for painting and one that affects the entire pictre.
Some tools offer different sizing options. If so, a slider will appear at the bottom right side of the screen. This may affect the radius of a special effect (e.g., Darken) or painted object (e.g., Patterns), or other attributes (e.g., large versus small Brick shapes).
⚙ Note: If the "
nomagicsizes" option is set, Tux Paint won't display the sizing controls. See the "Options" documentation.💡 If the sizing option is disabled, the Magic plugin may simply offer a default size (e.g., Patterns), or it may make separate tools available with different pre-set sizes (e.g., Bricks and Googly Eyes).
📜 This option was added starting with Tux Paint version 0.9.30.
⚙ Note: If the "ungroupmagictools" option is set, Tux Paint won't split Magic tools into groups of related tools, and instead present them all as one large list. See the "Options" documentation.
This tool works similarly to the Paint Brush. Wherever you click (or click and drag), things you've added to your drawing will be erased, exposing the background that you chose when you started the drawing, be it a solid color, the background of a 'Starter' image, or a 'Template' image. (See Available Tools > Other Controls > "New" Command.)
 A number of eraser types are available, each offering multiple sizes are available:
As you move the mouse around, an outline follows the pointer, showing what part of the picture will be erased.
As you erase, a 'squeaky clean' eraser wiping sound is played.
⌨ Hold the [X] key while clicking for quick access to a small sharp round eraser (not available when the Text or Label tools are selected, when you're in the process of rotating a stamp or shape, or when using an interactive magic tool). Release the mouse to return to your currently-selected tool.
Clicking the "Undo" button will undo (revert) the last drawing action. You can even undo more than once!
⌨ Note: You can also press [Control / ⌘] + [Z] on the keyboard to Undo.
Clicking the "Redo" button will redo the drawing action you just un-did via the "Undo" command.
As long as you don't draw again, you can redo as many times as you had undone!
⌨ Note: You can also press [Control / ⌘] + [R] on the keyboard to Redo.
Clicking the 'New' button will start a new drawing. A dialog will appear where you may choose to start a new picture using a solid background color, or using a 'Starter' or 'Template' image (see below). You will first be asked whether you really want to do this.
When you use the 'Eraser' tool things you've added to your drawing will be removed, exposing the background you chose when starting a new drawing. (See Available Tools > Drawing Tools > "Eraser" Tool.)
⌨ Note: You can also press [Control / ⌘] + [N] on the keyboard to start a new drawing.
When using the 'Eraser' tool or the 'Eraser' mode of the 'Fill' tool, the original image from the 'Starter' or 'Template' will reappear. (See Available Tools > Drawing Tools > "Eraser" Tool and "Fill" Tool.)
The 'Flip' and 'Mirror' Magic tools affect the orientation of the 'Starter' or 'Template', as well. (See Available Tools > "Magic" Tool (Special Effects) > Flip and Mirror.)
When you load a 'Starter' or 'Template', draw on it, and then click 'Save,' it creates a new picture file — it doesn't overwrite the original, so you can use it again later (by accessing it from the 'New' dialog).
⚙ You can create your own 'Starter' and Template images. See the Extending Tux Paint documentation's sections on 'Starters' and Templates.
💡 You can also convert your saved drawings into Templates directly within Tux Paint, from the 'Open' dialog. See "Open", below.
If you've selected a Template in your personal templates folder, and it was created from within Tux Paint (using the "Template" button in the "Open" dialog), you may remove it from within Tux Paint, too. An 'Erase' (trash can) button will appear at the lower right of the list. Click it to erase the selected template. (You will be asked to confirm.)
💡 Note: On Linux, Windows, and macOS, the picture will be placed in your desktop's trash can / recycle bin (where you may recover and restore it, if you change your mind).
⚙ Note: The 'Erase' button may be disabled, via the "noerase" option.
⚙ Note: The solid colors can be placed at the end of the 'New' dialog (below the Starters and Templates), via the "newcolorslast" option.
This shows you a list of all of the pictures you've saved. If there are more than can fit on the screen, use the up and down arrows at the top and bottom of the list to scroll through the list of pictures.
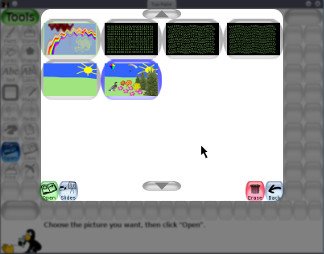
Click a picture to select it, and then...
Click the green 'Open' button at the lower left of the list to load the selected picture. You will then be able to edit it.
(Alternatively, you can double-click a picture's icon to load it.)
💡 If choose to open a picture, and your current drawing hasn't been saved, you will be prompted as to whether you want to save it or not. (See "Save," below.)
Click the brown 'Erase' (trash can) button at the lower right of the list to erase the selected picture. (You will be asked to confirm.)
📜 Note: On Linux (as of version 0.9.22), Windows (as of version 0.9.27), and macOS (as of version 0.9.29), the picture will be placed in your desktop's trash can / recycle bin (where you may recover and restore it, if you change your mind).
⚙ Note: The 'Erase' button may be disabled, via the "noerase" option.
Click the 'Export' button near the lower right to export the selected picture to your export folder. (e.g., "~/Pictures/TuxPaint/")
From the "Open" screen you can also:
Click the blue 'Slides' (slide projector) button at the lower left to go to slideshow mode. See "Slides", below, for details.
Click the blue 'Template' button at the lower left to go to convert the selected picture into a new template, which can be used as the basis for new drawings.
📜 Note: The Template creation feature was added to Tux Paint in version 0.9.31. To learn how to create Templates outside of Tux Paint, see Extending Tux Paint
⚙ The Template creation feature can be disabled (e.g., by selecting "Disable 'Make Template'" in Tux Paint Config. or running Tux Paint with the "notemplateexport" option).
Click the red 'Back' arrow button at the lower right of the list to cancel and return to the picture you were drawing.
⌨ Note: You can also press [Control / ⌘] + [O] on the keyboard to bring up the 'Open' dialog.
This saves your current picture.
If you haven't saved it before, it will create a new entry in the list of saved images. (i.e., it will create a new file)
💡 Note: It won't ask you anything (e.g., for a filename). It will simply save the picture, and play a "camera shutter" sound effect.
If you have saved the picture before, or this is a picture you just loaded using the "Open" command, you will first be asked whether you want to save over the old version, or create a new entry (a new file).
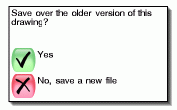
⚙ Note: If either the "saveover" or "saveovernew" options are set, it won't ask before saving over. See the "Options" documentation.
⌨ Note: You can also press [Control / ⌘] + [S] on the keyboard to save.
Click this button and your picture will be printed!
On most platforms, you can also hold the [Alt] key (called [Option] on Macs) while clicking the 'Print' button to get a printer dialog. Note that this may not work if you're running Tux Paint in fullscreen mode. See below.
The "noprint" option can be set, which will disable Tux Paint's 'Print' button.
⚙ See the "Options" documentation.
The "printdelay" option can be set, which will only allow occasional printing — once every so many seconds, as configured by you.
For example, with "printdelay=60" in Tux Paint's configuration file, printing can only occur once per minute (60 seconds).
⚙ See the "Options" documentation.
(Linux and Unix only)
Tux Paint prints by generating a PostScript representation of the drawing and sending it to an external program. By default, the program is:
lpr
This command can be changed by setting a "printcommand" option in Tux Paint's configuration file.
An alternative print command can be invoked by holding the "[Alt]" key on the keyboard while clicking clicking the 'Print' button, as long as you're not in fullscreen mode, an alternative program is run. By default, the program is KDE's graphical print dialog:
kprinter
This command can be changed by setting a "altprintcommand" option in Tux Paint's configuration file.
⚙ See the "Options" documentation.
(Windows and macOS)
By default, Tux Paint simply prints to the default printer with default settings when the 'Print' button is pushed.
However, if you hold the [Alt] (or [Option]) key on the keyboard while clicking the 'Print' button, as long as you're not in fullscreen mode, your operating system's printer dialog will appear, where you can change the settings.
You can have the printer configuration changes stored between Tux Paint sessions by setting the "printcfg" option.
If the "printcfg" option is used, printer settings will be loaded from the file "printcfg.cfg" in your personal folder (see below). Any changes will be saved there as well.
⚙ See the "Options" documentation.
By default, Tux Paint only shows the printer dialog (or, on Linux/Unix, runs the "altprintcommand"; e.g., "kprinter" instead of "lpr") if the [Alt] (or [Option]) key is held while clicking the 'Print' button.
However, this behavior can be changed. You can have the printer dialog always appear by using "--altprintalways" on the command-line, or "altprint=always" in Tux Paint's configuration file. Conversely, you can prevent the [Alt]/[Option] key from having any effect by using "--altprintnever", or "altprint=never".
⚙ See the "Options" documentation.
The 'Slides' button is available in the 'Open' dialog. It can be used to play a simple animation within Tux Paint, or a slideshow of pictures. It can also export an animated GIF based on the chosen images.
When you enter the 'Slides' section of Tux Paint, it displays a list of your saved files, just like the 'Open' dialog.
Click each of the images you wish to display in a slideshow-style presentation, one by one. A digit will appear over each image, letting you know in which order they will be displayed.
You can click a selected image to unselect it (take it out of your slideshow). Click it again if you wish to add it to the end of the list.
A sliding scale at the lower left of the screen (next to the 'Play' button) can be used to adjust the speed of the slideshow or animated GIF, from slowest to fastest. Choose the leftmost setting to disable automatic advancement during playback within Tux Paint — you will need to press a key or click to go to the next slide (see below).
💡 Note: The slowest setting does not automatically advance through the slides. Use it for when you want to step through them manually. (This does not apply to an exported animated GIF.)
To play a slideshow within Tux Paint, click the 'Play' button.
💡 Note: If you hadn't selected any images, then all of your saved images will be played in the slideshow!
During the slideshow, press [Space], [Enter] or [Return], or the [Right arrow] — or click the 'Next' button at the lower left — to manually advance to the next slide. Press [Left arrow] to go back to the previous slide.
Press [Escape], or click the 'Back' button at the lower right, to exit the slideshow and return to the slideshow image selection screen.
![]() Click the 'GIF Export' button near the lower right to have Tux Paint generate an animated GIF file based on the selected images.
Click the 'GIF Export' button near the lower right to have Tux Paint generate an animated GIF file based on the selected images.
💡 Note: At least two images must be selected. (To export a single image, use the 'Export' option from the main 'Open' dialog.) If no images are selected, Tux Paint will not attempt to generate a GIF based on all saved images.
Pressing [Escape] during the export process will abort the process, and return you to the 'Slideshow' dialog.
Click 'Back' in the slideshow image selection screen to return to the 'Open' dialog.
Clicking the 'Quit' button, closing the Tux Paint window, or pushing the [Escape] key will quit Tux Paint.
You will first be prompted as to whether you really want to quit.
If you choose to quit, and you haven't saved the current picture, you will first be asked if wish to save it. If it's not a new image, you will then be asked if you want to save over the old version, or create a new entry. (See "Save" above.)
⚙ Note: If the image is saved, it will be reloaded automatically the next time you run Tux Paint -- unless the "startblank" option is set.
⚙ Note: The 'Quit' button within Tux Paint, and quitting via the [Escape] key, may be disabled, via the "noquit" option.
In that case, the "window close" button on Tux Paint's title bar (if not in fullscreen mode) or the [Alt] + [F4] key sequence may be used to quit.
If neither of those are possible, the key sequence of [Shift] + [Control / ⌘] + [Escape] may be used to quit.
⚙ See the "Options" documentation.
There is no on-screen control button at this time, but by using the [Alt] + [S] keyboard sequence, sound effects can be disabled and re-enabled (muted and unmuted) while the program is running.
Note that if sounds are completely disabled via the "nosound" option, the [Alt] + [S] key combination has no effect. (i.e., it cannot be used to turn on sounds when the parent/teacher wants them disabled.)
⚙ See the "Options" documentation.
Tux Paint's main mode of operation is via any device that appears to your operating system as a mouse, including standard mice, trackballs, and trackpads, as well as drawing tablets (usually operated with a stylus) and touch screens (operated with a finger and/or a stylus) (see "Using a Tablet or Touchscreen" below for more information).
For drawing and controlling Tux Paint, only a single mouse button is used — typically, on multi-button mice, this will the left mouse button, but this can usually be configured at the operating system level. By default, Tux Paint will ignore input from the other button(s). If a user attempts to use the other button(s), a pop-up dialog will eventually appear reminding them that only one button is recognized Tux Paint. However, you may configure Tux Paint to accept any button as input (see the Options documentation).
Many input devices offer a way to quickly scroll within applications — many mice have a scroll wheel, trackballs have scroll rings, and trackpads recognize certain "scroll" gestures (e.g., two-finger vertical motion, or vertical motion on the edge of the trackpad). Tux Paint supports scrolling input to allow quick scrolling through certain lists (e.g., Stamps, Magic tools, and the New and Open dialogs).
Tux Paint will also automatically scroll if you click and hold the mouse down on an scroll button — the "up" and "down" arrow buttons that appear above and below scrolling lists.
Other devices that appear as a mouse can be used to control Tux Paint. For example:
Tux Paint offers a "sticky mouse click" accessibility setting, where a single click begins a click-and-drag operation, and a subsequent click ends it. (See the Options documentation.)
As noted above, Tux Paint recognizes any device that appears as a mouse. This means drawing tablets and touchscreens may be used. However, these devices often support other features beyond X/Y motion, button clicks, and scroll-wheel motion. Currently, those additional features are not supported by Tux Paint. Some examples:
Tux Paint may be configured to recognize input from any game controller that appears to your operating system as a joystick. That even includes modern game console controllers connected via USB or Bluetooth (e.g., Nintendo Switch or Microsoft Xbox game pads)!
Numerous configuration options are available to best suit the device being used, and the user's needs. Analog input will be used for coarse movement, and digital "hat" input for fine movement. Buttons on the controller can be mapped to different Tux Paint controls (e.g., acting as the [Escape] key, switching to the Paint tool, invoking Undo and Redo operations, etc.). See the Options documentation for more details.
Tux Paint offers an option to allow the keyboard to be used to control the mouse pointer. This includes motion and clicking, as well as shortcuts to navigate between and within certain parts of the interface. See the Options documentation for more details.
Tux Paint's 'Open' dialog only displays pictures you created with Tux Paint. So what do you do if you want to load some other drawinng or even a photograph into Tux Paint, so you can edit or draw on it?
You can simply convert the picture to the format Tux Paint uses — PNG (Portable Network Graphic) — and place it in Tux Paint's "saved" directory/folder. Here is where to find it (by default):
C:\Users\username\AppData\Roaming\TuxPaint\saved\"AppData%APPDATA%%APPDATA%\Tuxpaint\Saved"[⊞ (Windows)] + [R] key combination to bring up the Run command window, and then type the path and hit [Enter / Return]. /Users/username/Library/Application Support/TuxPaint/saved/"/home/username/.tuxpaint/saved/"$HOME$HOME/.tuxpaint/saved"/boot/home/config/settings/TuxPaint/saved/"💡 Note: It is also from this folder that you can copy or open pictures drawn in Tux Paint using other applications, though the 'Export' option from Tux Paint's 'Open' dialog can be used to copy them to a location that's easier and safer to access.
tuxpaint-import"
Linux and Unix users can use the "tuxpaint-import" shell script which gets installed when you install Tux Paint. It uses some NetPBM tools to convert the image ("anytopnm"), resize it so that it will fit in Tux Paint's canvas ("pnmscale"), and convert it to a PNG ("pnmtopng").
It also uses the "date" command to get the current time and date, which is the file-naming convention Tux Paint uses for saved files. (Remember, you are never asked for a 'filename' when you go to save or open pictures!)
To use this script, simply run it from a command-line prompt, and provide it the name(s) of the file(s) you wish to convert.
They will be converted and placed in your Tux Paint "saved" directory.
💡 Note: If you're doing this for a different user (e.g., your child) you'll need to make sure to run the command under their account.)
Example:
$ tuxpaint-import grandma.jpg

      grandma.jpg ->
      /home/username/.tuxpaint/saved/20211231012359.png

      jpegtopnm: WRITING A PPM FILE
The first line ("tuxpaint-import grandma.jpg") is the command to run. The following two lines are output from the program while it's working.
Now you can load Tux Paint, and a version of that original picture will be available under the 'Open' dialog. Just double-click its icon!
Windows, macOS, and Haiku users who wish to import arbitrary images into Tux Paint must do so via a manual process.
Load a graphics program that is capable of both loading your picture and saving a PNG format file. (See the documentation file "PNG.html" for a list of suggested software, and other references.)
When Tux Paint loads an image that's not the same size as its drawing canvas, it scales (and sometimes smears the edges of) the image so that it fits within the canvas.
To avoid having the image stretched or smeared, you can resize it to Tux Paint's canvas size. This size depends on the size of the Tux Paint window, or resolution at which Tux Paint is run, if in fullscreen. (Note: The default resolution is 800x600.) See "Calculating Image Dimensions", below.
Save the picture in PNG format. It is highly recommended that you name the filename using the current date and time, since that's the convention Tux Paint uses:
YYYYMMDDhhmmss.png
YYYY = YearMM = Month (two digits, "01"-"12")DD = Day of month (two digits, "01"-"31")HH = Hour (two digits, in 24-hour format, "00"-"23")mm = Minute (two digits, "00"-"59")ss = Seconds (two digits, "00"-"59")
Example: "20210731110500.png", for July 31, 2021 at 11:05am.
Place this PNG file in your Tux Paint "saved" directory/folder. (See above.)
This part of the documentation needs to be rewritten, since the new "buttonsize" option was added. For now, try drawing and saving an image within Tux Paint, then determine what size (pixel width and height) it came out to, and try to match that when scaling the picture(s) you're importing into Tux Paint.
Other documentation included with Tux Paint (found in the "docs" folder/directory) includes:
magic-docs")If you need help, there are numerous ways to interact with Tux Paint developers and other users:
To learn more, visit the "Contact" page of the official Tux Paint website: https://tuxpaint.org/contact/
Tux Paint is a volunteer-driven project, and we're happy to accept your help in a variety of ways:
To learn more, visit the "Help Us" page of the official Tux Paint website: https://tuxpaint.org/help/
Tux Paint maintains a presence on a variety of social media networks, where we post updates and artwork.